Battery switch on travel trailer function is crucial for managing your RV’s power. Understanding how your battery switch works is key to preventing electrical issues and maximizing battery life. This guide will walk you through different switch types, safe connection procedures, troubleshooting tips, and essential safety precautions, ensuring you’re confident in handling your travel trailer’s power system.
We’ll cover everything from the mechanics of 1-2-both switches to diagnosing problems with a multimeter, integrating your switch with solar panels and converters, and performing regular maintenance. By the end, you’ll be a pro at keeping your RV’s power flowing smoothly.
Types of Battery Switches in Travel Trailers: Battery Switch On Travel Trailer Function
Choosing the right battery switch for your travel trailer is crucial for managing power efficiently and safely. Understanding the different types available helps you make an informed decision based on your needs and setup. This section will detail the common types, their internal workings, and their respective pros and cons.
Battery Switch Types: 1-2-Both, 1-2-Off, and Others
Travel trailers typically use battery switches to isolate and control power from multiple batteries (like a house battery and a starting battery). The most common types are the 1-2-Both and 1-2-Off switches. Less common, but still used, are switches with more complex configurations for managing multiple battery banks or specialized charging systems. These switches are usually rotary switches, though some newer systems use electronic switches.
Internal Mechanisms and Power Routing
The 1-2-Both switch allows you to select power from either battery 1, battery 2, or both simultaneously. Internally, it uses a rotating selector mechanism that connects the output terminals to the appropriate battery terminals. The 1-2-Off switch operates similarly, but adds an “Off” position, completely disconnecting both batteries from the output. This provides additional safety by preventing accidental drain or short circuits.
More complex switches might incorporate multiple contact points and relays to manage more than two batteries or additional power sources.
Advantages and Disadvantages of Different Switch Types
The choice between a 1-2-Both and a 1-2-Off switch largely depends on individual needs and priorities. A 1-2-Both switch offers flexibility, allowing for combined power from both batteries when needed, but this increased flexibility also comes with a slightly higher risk of accidental short circuits or drain if not used carefully. A 1-2-Off switch prioritizes safety by providing a complete power disconnect, but lacks the combined power option.
More complex switches offer more control but increase complexity and cost.
Comparison Table of Battery Switch Types, Battery switch on travel trailer function
| Feature | 1-2-Both Switch | 1-2-Off Switch | More Complex Switches |
|---|---|---|---|
| Positions | 1, 2, Both | 1, 2, Off | Variable, depending on configuration (e.g., 1, 2, 3, Both, Off, combinations) |
| Power Routing | Direct connection to selected battery or both | Direct connection to selected battery or complete disconnect | More complex routing based on relay and contact arrangements |
| Pros | Flexibility, combined power available | Safety, complete power isolation | Greater control, management of multiple battery banks |
| Cons | Slightly higher risk of accidental short circuits | Limited flexibility, no combined power | Higher cost, increased complexity |
Connecting and Disconnecting Batteries
Connecting and disconnecting your travel trailer batteries safely is crucial for preventing damage to your electrical system and avoiding personal injury. This process involves understanding your battery switch, observing correct polarity, and taking precautions against accidental short circuits. Always remember that working with batteries involves potential hazards, so proceed with caution.Properly connecting and disconnecting your batteries using a battery switch is straightforward but requires attention to detail.
Improper handling can lead to sparks, damage to the batteries, or even electrical shock. This section details the steps for safe operation, regardless of whether you have a single- or dual-battery setup.
Battery Switch Operation
Before beginning any work, always ensure the battery switch is in the “OFF” position. This will disconnect all power from the batteries, preventing accidental shorts or shocks. Many switches have clearly labeled positions for “OFF,” “BATTERY 1,” “BATTERY 2,” and “BOTH.” Some more advanced switches may offer additional configurations. Familiarize yourself with your specific switch’s markings and operation before proceeding.
Connecting Batteries
To connect your batteries, first verify that the battery switch is in the “OFF” position. Next, locate your batteries (usually housed in a dedicated compartment) and inspect the terminals for corrosion. Clean any corrosion using a wire brush and baking soda solution. Once clean, connect the positive (+) cable to the positive terminal of the first battery and the negative (-) cable to the negative terminal.
Repeat this process for any additional batteries in your setup, ensuring you maintain correct polarity. Only after this is done, switch the battery switch to the desired position (“BATTERY 1,” “BATTERY 2,” or “BOTH”).
Disconnecting Batteries
To disconnect your batteries, begin by turning the battery switch to the “OFF” position. This is the critical first step, disconnecting power from the system. Next, carefully disconnect the negative (-) cable from the negative terminal of each battery, followed by disconnecting the positive (+) cable from the positive terminal. Always disconnect the negative cable first and connect it last.
This minimizes the risk of accidental short circuits.
Polarity and Safety Precautions
Correct polarity is paramount. Connecting the positive (+) cable to a negative (-) terminal or vice-versa can cause sparks, damage to the electrical system, and potentially injury. Always double-check the cable markings and battery terminal markings before making any connections. Wear safety glasses to protect your eyes from potential sparks. If you are unsure about any aspect of the process, consult a qualified electrician or refer to your travel trailer’s owner’s manual.
So, you’re an audiophile who travels? Awesome! Check out this guide on setting up your audiophile travel setup to ensure you still enjoy top-notch sound on the go. It’s crucial to protect your expensive gear, and remember to get proper travel insurance too! Before you jet off, make sure you’ve sorted out your Aon travel insurance – you don’t want any unexpected mishaps to ruin your trip.
Planning ahead is key for a smooth and enjoyable experience.
Never work on the electrical system while it is raining or in damp conditions. Keep a fire extinguisher nearby as a precaution.
Switching Between House and Chassis Batteries
If your travel trailer has separate house and chassis batteries, your battery switch will likely allow you to switch between them. The procedure is similar to connecting and disconnecting a single battery, but you’ll be selecting which battery bank (house or chassis) powers the associated circuits. For example, you might use the house battery for interior lights and appliances, while the chassis battery powers the engine starting system.
The switch allows you to isolate one bank from the other, extending battery life and preventing accidental drain. Always refer to your specific switch’s instructions and your trailer’s wiring diagram for the correct operation.
Troubleshooting Common Battery Switch Issues
Your travel trailer’s battery switch is a crucial component, managing power flow to your house batteries and ensuring a smooth camping experience. When problems arise, diagnosing the issue quickly is key to getting back to enjoying your trip. This section Artikels common problems and provides straightforward troubleshooting steps.Troubleshooting a malfunctioning battery switch can seem daunting, but with a systematic approach, you can often pinpoint the problem and fix it yourself.
Remember safety first – always disconnect the negative battery terminal before working with any electrical components.
Common Battery Switch Problems and Their Causes
Several issues can arise with your travel trailer’s battery switch. These range from a complete lack of power to intermittent power surges or complete switch failure. A common cause is corrosion on the terminals, leading to poor electrical contact. Another frequent culprit is a faulty switch itself, possibly due to wear and tear or exposure to the elements.
Loose wiring connections can also cause intermittent power or complete power loss. Finally, a blown fuse within the switch’s circuitry can also interrupt power.
Diagnosing Battery Switch Problems
Before diving into testing, visually inspect the switch and its connections. Look for corrosion on the terminals, loose wires, or any signs of physical damage. Clean any corroded terminals with a wire brush and baking soda solution. Tighten any loose connections. If you find visible damage, you’ll likely need to replace the switch.
Testing the Switch with a Multimeter
A multimeter is an invaluable tool for diagnosing electrical problems. To test your battery switch, first, ensure the switch is in the “off” position. Set your multimeter to measure DC voltage. Then, place one multimeter probe on each terminal of the switch. You should read near zero volts.
Next, turn the switch to the “on” position. If the switch is functioning correctly, you should now read a voltage equal to your battery voltage (typically around 12 volts for a 12-volt system). A reading significantly lower than your battery voltage indicates a problem with the switch or its connections. If you read zero volts even with the switch “on”, the switch itself may be faulty.
Troubleshooting Flowchart
Here’s a simple flowchart to guide your troubleshooting:
- Visual Inspection: Check for corrosion, loose wires, or damage. Clean/tighten as needed.
- Test with Multimeter (Switch OFF): Measure voltage across terminals. Should read near zero volts.
- Test with Multimeter (Switch ON): Measure voltage across terminals. Should read battery voltage (e.g., ~12V).
- Zero Volts in both OFF and ON states: Switch is likely faulty. Replace the switch.
- Voltage significantly lower than battery voltage: Poor connections or internal switch problem. Check connections; consider replacing the switch.
- Correct voltage reading: The switch is working correctly. Investigate other potential causes (fuses, wiring, battery itself).
Battery Switch and Electrical System Integration

Your travel trailer’s battery switch isn’t just a simple on/off switch; it’s a crucial component that manages the flow of power throughout your trailer’s electrical system. Understanding its interaction with other systems is key to maximizing your RV’s efficiency and extending the life of your batteries. This section details how the battery switch works in conjunction with other electrical components and its impact on overall power management.The battery switch acts as the central control point for your trailer’s 12-volt DC power.
It dictates which power sources feed your house batteries and which loads are powered by those batteries. This control is vital for preventing accidental drain and ensuring efficient power distribution.
Power Flow and Component Interactions
The battery switch plays a pivotal role in managing the flow of power from various sources to different components within your travel trailer. A typical setup involves several key players: the batteries themselves, the converter, the inverter, and potentially solar panels.
- Batteries: These are your primary DC power source, providing power for lights, water pumps, and other 12V appliances. The battery switch controls whether these batteries are connected to the rest of the system or isolated.
- Converter: This device transforms the 12V DC power from your batteries into 120V AC power, necessary for running most household appliances. The battery switch ensures the converter only draws power from the batteries when they are connected and the switch is in the “on” position. If the switch is off, the converter won’t drain the batteries.
- Inverter: Similar to the converter, the inverter also transforms DC power to AC power, but often from a different power source (the house batteries). The battery switch controls the power flow to the inverter, preventing it from drawing power when the batteries are disconnected. An inverter’s use is often more temporary than a converter, frequently used to power electronics when shore power isn’t available.
- Solar Panels (if equipped): Solar panels charge your batteries directly. The battery switch doesn’t directly control the flow
-from* the solar panels to the batteries (that’s usually handled by a charge controller), but it
-does* control whether the charged batteries are then available to power the trailer’s systems. With the switch off, even a fully charged battery bank won’t power anything.
Power Distribution Management
The battery switch’s primary function is to manage power distribution. By selectively connecting or disconnecting the batteries, you can prevent unwanted power drain when the trailer isn’t in use. This is particularly important for preventing a completely drained battery bank, which can lead to costly replacements. For instance, leaving the switch in the “off” position while your trailer is stored prevents any parasitic drain from things like clocks or low-power electronics that might remain active.
So, you’re an audiophile who travels? Awesome! Check out this guide on setting up an audiophile travel setup to make sure your tunes sound amazing on the go. Don’t forget to sort out your travel insurance too! Getting Aon travel insurance is a smart move before you jet off, protecting your gear and yourself from unexpected issues.
It’s all about enjoying the journey, right? Good music and peace of mind – that’s the perfect travel combo!
Energy Conservation and Battery Life Extension
Efficient power management directly impacts battery life. By isolating the batteries when not needed, you significantly reduce the risk of deep discharges, which can damage batteries over time. A fully charged battery bank that sits idle for an extended period is far less likely to suffer from sulfation and capacity loss. Proper use of the battery switch is a key element in maintaining the health and longevity of your RV’s batteries.
Simplified Power Flow Diagram
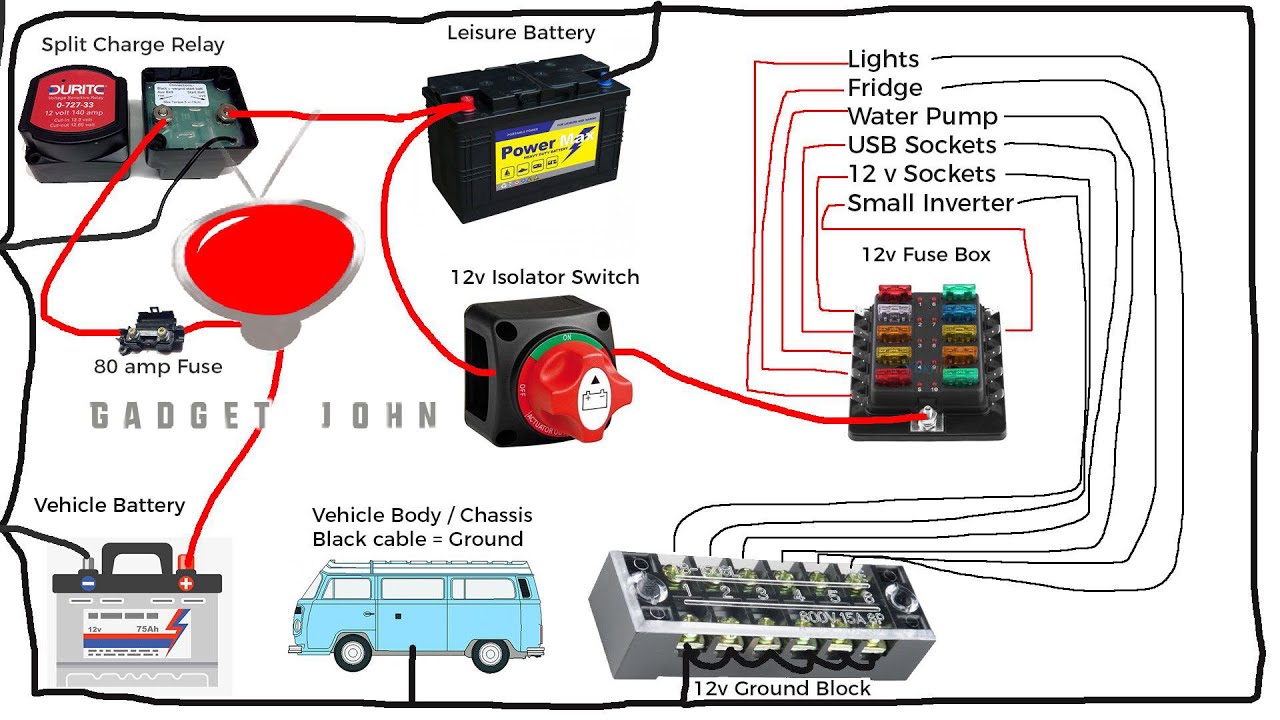
Imagine a simple diagram. A box labeled “Batteries” is connected to a box labeled “Battery Switch.” From the battery switch, three lines extend to three more boxes: “Converter,” “Inverter,” and “House Loads” (representing lights, pumps, etc.). A separate line runs from “Solar Panels” directly to the “Batteries” box, implying the charge controller is managing that pathway. The battery switch acts as the gatekeeper, controlling the flow of power from the batteries to the other components.
The “off” position cuts all connections from the batteries to the rest of the system. The “on” position connects the batteries to the converter, inverter, and house loads.
Safety Precautions When Using a Battery Switch
Working with batteries and electrical systems in your travel trailer requires careful attention to safety. Improper handling can lead to serious consequences, including electrical shocks, burns, explosions, and even fires. Always prioritize safety when connecting, disconnecting, or troubleshooting your battery switch.
The risks associated with improper battery switch use are significant. A short circuit, for instance, can generate intense heat, potentially igniting nearby flammable materials. Incorrectly connecting wires can result in a powerful electrical shock, causing injury or even death. Furthermore, battery gases are explosive, and a spark near the battery terminals could trigger a dangerous explosion. Therefore, following established safety procedures is paramount.
Preventing Accidental Short Circuits
Preventing accidental short circuits is crucial to ensure safety when working with your travel trailer’s battery switch. Short circuits occur when the positive (+) and negative (-) terminals of a battery are directly connected, creating a pathway for excessive current flow. This generates substantial heat and can lead to sparks, fires, and damage to the electrical system. To avoid this, always ensure that the battery terminals are clean and free from debris before connecting or disconnecting any wires.
Never leave tools or metal objects across the battery terminals. When working with wires, keep them organized and properly insulated to prevent accidental contact. Use insulated tools and gloves to further minimize the risk of short circuits.
Safety Equipment for Working with Battery Switches
Before beginning any work on your travel trailer’s battery system, assemble the necessary safety equipment. This is not just a precaution; it’s essential for your safety. The equipment list includes:
- Safety Glasses: Protect your eyes from sparks, splashes of battery acid, and other potential hazards.
- Insulated Gloves: Prevent electrical shocks by providing an insulating barrier between your hands and the battery terminals.
- Insulated Tools: Use screwdrivers, pliers, and wrenches with insulated handles to prevent accidental shocks.
- Baking Soda: Keep a container of baking soda handy to neutralize any spilled battery acid. Battery acid is corrosive and can cause burns.
- Ventilation: Work in a well-ventilated area. Battery gases are flammable and potentially harmful if inhaled.
- Fire Extinguisher: Have a suitable fire extinguisher (Class B or ABC rated) readily available in case of fire.
Working Safely with Battery Terminals
Always disconnect the negative (-) terminal first when working on the battery system. This is a standard safety procedure that helps to minimize the risk of accidental shocks. When reconnecting, connect the positive (+) terminal last. This ensures that the circuit is not accidentally completed before you’re ready. When disconnecting, carefully remove the terminal clamps without touching any metal parts with your bare hands.
Clean the battery terminals regularly to remove corrosion build-up which can impede current flow and increase the risk of overheating.
Maintaining Your Battery Switch
Keeping your travel trailer’s battery switch in good working order is crucial for reliable power and preventing costly repairs. Regular inspection and maintenance will ensure your batteries are properly connected and disconnected, preventing accidental discharges and extending the life of both your batteries and the switch itself. Neglecting maintenance can lead to corrosion, poor connections, and ultimately, switch failure.Regular maintenance prevents problems before they become major headaches.
A simple check now can save you significant time and money down the road.
Battery Switch Inspection Schedule
A consistent maintenance schedule is key. Aim for a visual inspection of your battery switch at least once a month, particularly before and after extended periods of storage. A more thorough cleaning and inspection should be conducted every six months, or more frequently in harsh environments with high humidity or salt exposure. Annual checks should include a careful examination of all connections and terminals for signs of wear and tear.
Cleaning the Battery Switch and Terminals
Before cleaning, always disconnect the batteries from the switch to avoid accidental shocks. Use a wire brush or a specialized battery terminal cleaner to remove any corrosion or build-up from the switch and its terminals. Pay close attention to the contact points where the cables connect to the switch. A solution of baking soda and water can be used to neutralize any acid residue, followed by a thorough rinsing with clean water.
After cleaning, apply a thin layer of dielectric grease to the terminals to prevent future corrosion and ensure a good electrical connection. This grease helps repel moisture and keeps the connections clean and efficient.
Extending Battery Switch Lifespan
Several practices can significantly extend the lifespan of your battery switch. Avoid excessive tightening of the terminal bolts; over-tightening can damage the switch and the cables. Use the correct size wrench or socket to prevent stripping the bolts. Always ensure the switch is properly secured in its mounting location to prevent vibration damage. Storing your travel trailer in a dry environment minimizes corrosion and extends the life of the switch and its components.
Regularly inspecting and cleaning the switch, as Artikeld above, is crucial for preventing premature wear and tear. If you notice any signs of damage or malfunction, address them promptly to avoid further complications.
Mastering your travel trailer’s battery switch is about more than just turning power on and off; it’s about understanding your RV’s electrical system and ensuring safe and efficient operation. By following the safety guidelines and troubleshooting steps Artikeld here, you can confidently manage your power, extend your battery life, and enjoy worry-free adventures on the road. Remember, regular maintenance and careful handling are your best allies in preventing electrical problems and keeping your RV running smoothly.
Popular Questions
What happens if I connect the battery cables incorrectly?
Connecting battery cables incorrectly can cause a short circuit, potentially damaging your battery, switch, or other electrical components. In severe cases, it could even start a fire. Always double-check polarity before connecting.
How often should I inspect my battery switch?
Ideally, inspect your battery switch at least once a year, or more frequently if you use your travel trailer extensively. Look for corrosion, loose connections, and any signs of damage.
My battery switch is making a clicking noise. What’s wrong?
A clicking noise often indicates a problem with the switch itself, potentially a faulty internal mechanism or worn-out contacts. It might also signal a low battery voltage. Try cleaning the terminals and check your battery voltage. If the problem persists, the switch may need replacement.
Can I use a battery switch with solar panels?
Yes, but proper wiring is essential. You’ll typically want to connect your solar panels to a charge controller, which then connects to your battery bank. The battery switch controls the flow of power from the batteries to the rest of your RV’s electrical system.
